
Implementing Routing in React Applications using React Router.
A navigation guide.


Prerequisites
Basic Javascript, React.js, and HTML knowledge. A little CSS may be helpful, but not necessarily needed.
Development environment running Node.js.
Introduction
React router is an external library built on top of React which enables routing in React. The router is chiefly used for single-page web applications to define multiple routes. This feature allows users to navigate through or visit multiple web pages in a single web application by entering or clicking URLs defined in the route while still preserving the user state.
A client-side rendering mechanism is provided by react routing, which allows the execution to be done on the user’s device rather than the server. The user’s server gets a barebone HTML document with the JavaScript file when the URL is originally visited or requested, which is subsequently downloaded to the user's browser to be executed locally. This allows the webpage to dynamically create the content and structure of the page based on the user's interactions. As users interact with the website, the JavaScript code can dynamically change the website's content without a full page reload, escaping re-rendering.
Setting up React Router
For setting up react-router, you’ll need to have react running either with create react app or vite, and Node.js is installed to run the command on the terminal.
The first step to installing React Router is to install the react-router-dom package which contains the react router. For npm, run on your terminal;
npm install react-router-dom
For yarn, run;
yarn add react-router-dom
After installing the React router package, to enable routing in React applications, the BrowserRouter is to be imported from the react-router-dom. It would look like:
import React from 'react';
import ReactDom from 'react-dom/client';
import { BrowserRouter } from 'react-router-dom';
At the root component of every react application, is wrapped by default, a React.StrictMode component. However, some React applications use the React.StrictMode and BrowserRouter interchangeably, replacing the React.StrictMode with the BrowserRouter. It is noteworthy that these components in the React ecosystem serve different purposes. While the BrowserRouter handles client-side routing, the React.StrictMode enables the performance of additional checks and validations during rendering and updates. It is common practice to wrap both in the root component.
import { BrowserRouter } from 'react-router-dom';
import App from './App';

const root = ReactDOM.createRoot(document.getElememtById('root'));
root.render(
 <React.StrictMode>
   <BrowserRouter>
      <App />
   </BrowserRouter>
 </React.StrictMode>
);
Route configuration
Route configuration entails instructions to the router on how to match the URL and what code to run when the match occurs or otherwise. For route configuration, there are three primary components in react router.
Routers: The routers are the
BrowserRouterandHashRoutercomponents. Both components are similar, the difference between them is how they may work under the hood to handle URLs/Paths.The
BrowserRouteruses the HTML5 History API to manage application routing, keeping the UI in sync with the URL. While it enables the application to maintain clean routes, it needs to be backed by a web server that is configured to handle client side rendering. On the client side, thewindow.location.pathnameproperty is parsed. The property contains the path part of the URL, excluding the domain and query parameters, and the information determines which component should be rendered based on the current route.In using
HashRouter, the URL changes and page navigation are not sent to the server. It useswindow.location.hashto memorize the changes in the history stack of the browser. This router uses the URL hash portion to manage routing and is suitable in cases of minimal control over server configuration, such as static sites. As opposed toBrowserRouterwhich provides clean readable URLs,HashRouterhas a rather unattractive URL syntax;http://localhost:3000/#/about.Routers create a history object with inbuilt functions which keeps track of the current location and re-render the app when the location varies.
Below is an illustration of how the history object work when the
BrowserRouterandHashRoutercall thecreateHistoryfunctions. [Image gotten from Some Blog]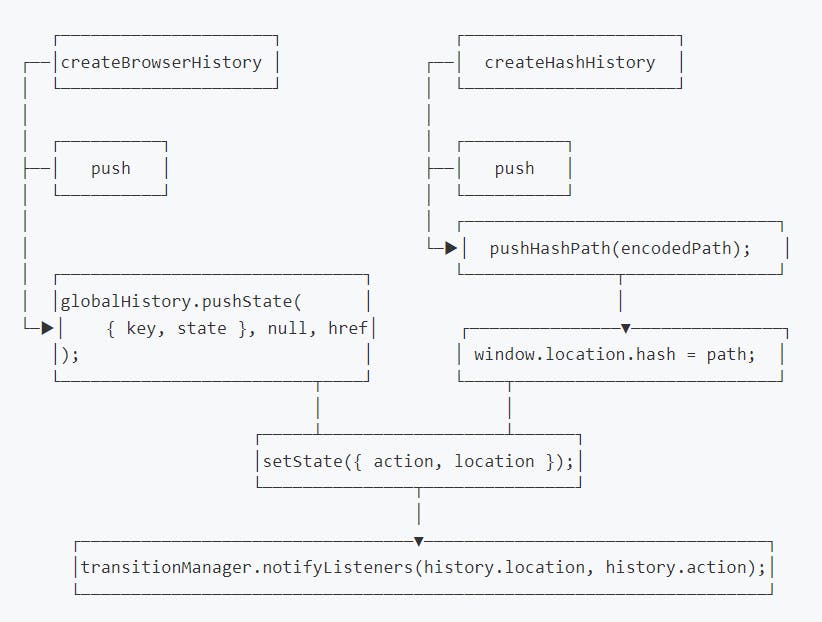
Route matchers: This consists of the
RoutesandRoutecomponents.The
Routescomponent, an advancement fromReact v6which replaced theswitchcomponent, is vital in react routing, as it renders the accurate UI from the component when the location and the route path match. TheRoutesact as a parent for theRoute.The
Routehas two props;pathandelement.Thepathdefines the matching pathname for theroute, while theelementcontains the component to render.import { Routes, Route } from 'react-router-dom'; import Home from './Components/Home'; import Contact from './Components/Contact'; function App() { return ( <div> <Routes> <Route path = '/' element = {<Home />} /> <Route path = 'Contact' element = {<Contact />} /> </Routes> </div> ); } export default App;Navigation: It consists of the
LinkandNavLinkcomponents. These components enable navigating defined routes. They render an<a> anchor tagunder the hood. They use thetoattribute to specify the target route, which is either a string or an object. The object here has four properties; pathname, search, hash, and state.The
Linkcomponent creates hyperlinks, enabling navigating different routes in an application without re-rendering the page.import { Link } from 'react-router-dom'; function NavBar() { return ( <nav> <Link to="/">Home</Link> <Link to="/about">About</Link> <Link to="/contact">Contact</Link> </nav> ); }; export default NavBar;The
NavLinkworks exactly like the link, except it's used to highlight the current or active link. It has styling capabilities, allowing styling based on the current route, making it easy to identify an active route.import React from 'react'; import { NavLink } from 'react-router-dom'; function NavBar() { return ( <nav> <NavLink to="/" activeClassName="active">Home</NavLink> <NavLink to="/about" activeClassName="active">About</NavLink> <NavLink to="/contact" activeClassName="active">Contact</NavLink> </nav> ); } export default NavBar;
Programmatic navigation
Programmatic navigation refers to the alteration of route navigation following the occurrence of route actions, such as; sign-up, sign-in, form submission, etc. When route navigation is to be effected by the completion or occurrence of an event, programmatic navigation may be necessary.
The primary way to programmatically navigate in React is by using the redirect component. It entails conditional rendering and is used to navigate routes declaratively.
import React, { useState } from 'react';
import { Redirect } from 'react-router-dom';

function FormSubmit() {
  const [isSubmitted, setIsSubmitted] = useState(false);

  const handleFormSubmit = (event) => {
    event.preventDefault();
    setIsSubmitted(true);
  };

  return (
    <div>
      <h1>Login Form</h1>
      <form onSubmit={handleFormSubmit}>
        <label>
          Username:
          <input type="text" name="username" />
        </label>
        <label>
          Password:
          <input type="password" name="password" />
        </label>
        <button type="submit">Submit</button>
      </form>

      {isSubmitted && <Redirect to="/home" />}
    </div>
  );
}
export default FormSubmit;
The history object available in react router allows for the manual control of the browser history. Achieving programmatic navigation can be done with history.push() method provided by the history object. This method allows for navigation while React Router's props location, match, and history provides essential information and tools to manage routing behavior within the components. Although this is from an earlier version of react.
Here, the component triggers a route change, and react router renders the component for the new URL/ path, and the component receives the updated prop that corresponds with the new route.
import React from 'react';
import { Route } from 'react-router-dom';

function About (props) {
  const { history, location, match } = props;

  const handleNavigation = () => {
    history.push('/home');
  };

  return (
    <div>
      <h1>About what?</h1>
      <button onClick={handleNavigation}>Go to Home</button>
    </div>
  );
}

export default About;
React Router also provides hooks for programmatic navigation. These route-related hooks are; useHistory for accessing the history object; useLocation for accessing the current location; useParams for accessing route parameters, and; useNavigate.
The useHistory hook provides access to the React Router's history object and is used to manage the navigation history of a browser. The history object has inbuilt methods like; goBack() which enables navigating to the previous URL in the history stack; goForward which enables navigating to the next URL in the stack; push() allows new entry to the browser history stack, etc.
import React from 'react';
import { useHistory } from 'react-router-dom';

function Contact() {

    const history = useHistory();
    const handleGoBack = () => {
        history.goBack();
      };

  return (
    <div>
        <h1>Contact</h1>
        <p> lorem ipsum dolor sit amet </p>
        <button onClick={handleGoBack}>Go Back</button>
    </div>
  );
};

export default Contact
The useNavigate hook is an advancement of react v6 which has taken over the use of the useHistory hook for programmatic navigation. It is similar to the useHistory hook, except it has no methods. The hook just returns a function, enabling navigation through routes.
import React from 'react';
import { useNavigate } from 'react-router-dom';

function Contact() {

    const navigate = useNavigate();
    const handleNavigation = () => {
        navigate('/');
    };

  return (
    <div>
        <h1>Contact</h1>
        <p> lorem ipsum dolor sit amet </p>
        <button onClick={handleNavigation}>Go Back Home</button>
    </div>
  );
};

export default Contact;
Route Guards
Route guards are used to control access to certain routes based on conditions, such as authentication status, log-in status, etc.
Route guards can be implemented using the Route component from the react-router or react-router-dom. The Route component provides a way to render components conditionally based on route matching. It can be implemented using the Route component's render prop or the component prop along with the Redirect component.
A route guard using the render prop would look like this:
import React from 'react';
import { BrowserRouter as Router, Route, Redirect } from 'react-router-dom';

const isAuthenticated = () => {
  return true;
};

const PrivateRoute = ({ component: Component, ...rest }) => (
  <Route
    {...rest}
    render={props =>
      isAuthenticated() ? (
        <Component {...props} />
      ) : (
        <Redirect to="/login" />
      )
    }
  />
);

const Home = () => <div>Home Page</div>;
const LoginPage = () => <div>Login Page</div>;
const Dashboard = () => <div>Dashboard Page</div>;

function App() {
  return (
    <Router>
      <Route path="/" exact component={Home} />
      <Route path="/login" component={LoginPage} />
      <PrivateRoute path="/dashboard" component={Dashboard} />
    </Router>
  );
};

export default App;
[Here, a PrivateRoute component that takes a component prop is defined, which represents the component to render. We also pass an isAuthenticated prop, which checks if the user is authenticated or not. Then the render function checks if the user is authenticated and renders the specified component if they are. If the user is not authenticated, they are redirected to the login page.]
Route guards can also be implemented by using Higher-Order components (HOCs). A Higher-Order Component (HOC) is a function that takes a component and returns a new component with enhanced functionality. When a component is wrapped within a HOC, we can effectively ensure that only authenticated users can access specific routes.
To effectively use this, the HOC is to be created, something like this;
import React from 'react';
import { Redirect } from 'react-router-dom';

const withAuthGuard = (Component, isAuthenticated) => {
  return props => {
      if (isAuthenticated) {
        return <Component {...props} />;
      } else {
        return <Redirect to="/login" />;
     }
   };
 };

export default withAuthGuard;
Afterward, the route component is to be wrapped within the HOC to be protected.
import { BrowserRouter, Routes, Route } from 'react-router-dom';
import withAuthGuard from './withAuthGuard';

const Home = () => <div>Home Page</div>;
const Dashboard = () => <div>Dashboard Page</div>;

const App = () => {
  const isAuthenticated = true; // set to true as a dummy logic.

  return (
    <BrowserRouter>
      <Routes>
        <Route path="/" exact component={withAuthGuard(Home, isAuthenticated)} />
        <Route path="/dashboard" component={withAuthGuard(Dashboard, isAuthenticated)} />
      </Routes>
    </BrowserRouter>
  );
};

export default App;
Here, the withAuthGuard HOC is used to protect the Home and Dashboard routes. If the user tries navigating either of the routes, it checks the authorization status. If the user is authorized, access will be granted, otherwise, the user will be redirected to the login page.
Nested Routing
Nested routes in React Router are a way of defining routes hierarchically. In this arrangement, a route (parent route) can have child routes. Each child route represents a portion of the URL. Nested routes provide a structure where certain routes are encapsulated within the components of other routes.
import { BrowserRouter, Routes, Route } from 'react-router-dom';
import Layout from './components/Layout';
import Home from './components/Home';
import Dashboard from './components/Dashboard';
import Profile from './components/Profile';

function App() {
  return (
    <BrowserRouter>
      <Routes>
        <Route path="/" element={<Layout />}>
          <Route index element={<Home />} />
          <Route path="dashboard" element={<Dashboard />} />
          <Route path="profile" element={<Profile />} />
        </Route>
      </Routes>
    </BrowserRouter>
  );
};

export default App;
Route Animation and Transition
Route animation and transition can be achieved by adjusting the CSS classes, durations, and easing functions. Animation libraries like react-transition-group can also be leveraged alongside for advanced animations. To use the react-transition-group library, its package should be installed.
# npm
npm install react-transition-group --save

# yarn
yarn add react-transition-group
The library has several components for achieving animation and transition state, and you can use the best suited for your objective. To know more, visit react-transition-group.
Below is an illustration of how we can animate using the CSSTransition component. This component is suitable if you're using CSS animation and transition, and it also inherits the props of the Transition component. [Open the sandbox to see the source code]
Route State Management
Route state management typically refers to the process of managing and maintaining the state of a user's navigation or interaction within a web application, especially when dealing with different views or pages.
In passing props, we can encounter props drilling problems, especially in a route hierarchy (nested routes). However, react context solves that problem. Props drilling is when props (data) are passed from a higher-level component down to a lower-level component through a series of intermediate components that don't need the data themselves. It creates an unnecessary chain of confusion in data flow and can alter application performance.
Here is an example of prop drilling. Data from the Parent component had to be passed through the Child component in the folder structure to get to the Grandchild component.
import React from 'react';

function ParentComponent() {
  const data = "Hello, Prop Drilling!";
  return <ChildComponent data={data} />;
}

function ChildComponent(props) {
  return <GrandchildComponent data={props.data} />;
}

function GrandchildComponent(props) {
  return <p>{props.data}</p>;
}
Context is one way of tackling this problem. React's Context API enables creating a context that provides data to components without passing props through intermediary components. The useContext hook is additionally implemented to use context in a child component. To create context, it must be imported from React.
import { createContext } from "react";
We'll use createContext to fix the prop drilling problem below.
import React, { createContext, useContext } from 'react';

//Create a context
const DataContext = createContext();

function ParentComponent() {
  const data = "Hello, Context!";
  return (
    <DataContext.Provider value={data}>
      <ChildComponent />
    </DataContext.Provider>
  );
}

function ChildComponent() {
  return <GrandchildComponent />;
}

function GrandchildComponent() {
  const data = useContext(DataContext);
  return <p>{data}</p>;
}
Here, prop drilling is defeated, as the prop is directly available to the descendant component without passing through the other components in the hierarchy.
State management libraries like Redux are also used to centralize and manage the application state in a more organized way as well.
Conclusion
The article covers how to effectively enable routing in react applications, and some other routing concepts like navigation guards, and custom route styling using external libraries.